In the middle of January (2026) I helped out (in a small way) with an AI and Assistive Tech hackathon being organised by Chris Mairs, Raspberry Pi and the startup accelerator Entrepreneur First. Chris was one of the founders of the company that became Metaswitch Networks and has been an active tech investor for the last few decades. He was registered blind at 18 and writes about blindness and technology on his blog The Open Eyed Man. You can read his take on the event here. This blog post is focused on the hardware I made (with files to 3D print) and opportunities for similar hardware to solve certain navigation problems for blind people.
Body-mounted Raspberry Pis and Robotic Tactile Direction Indicators
I think there are some good opportunities for AI in the area of urban navigation for blind and partially sighted people so the week before the hackathon I made some bits of hardware I thought could give teams a head start if they wanted to work on those use cases.
These included a couple of wearable housings for the setups Raspberry Pi had sent us for the teams to use (Raspberry Pi 5 + one of their AI Hats + a camera module). I also made wearable power supplies for these by connecting an 8xAA battery box to a buck converter and connecting that to half of a USB-C cable.
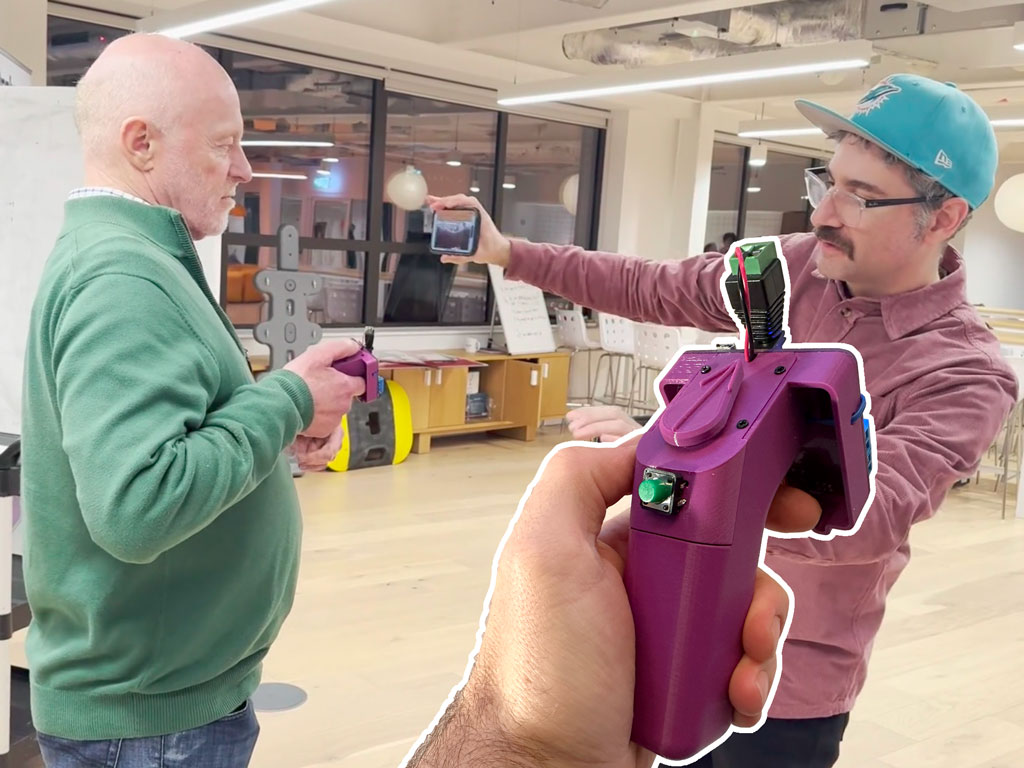
To provide teams with a device for a tactile UI I also made a pointing device (using a Smartibot board, a 9g servo and two momentary buttons of different shapes). Whenever I’ve been doing shadowing research I’ve always been impressed with the way guide dogs are able to accurately and intuitively signal direction to their owners (and how much better this works than trying to orient people with any kind of sound), so I figured something that indicated direction in a tactile way could be quite useful.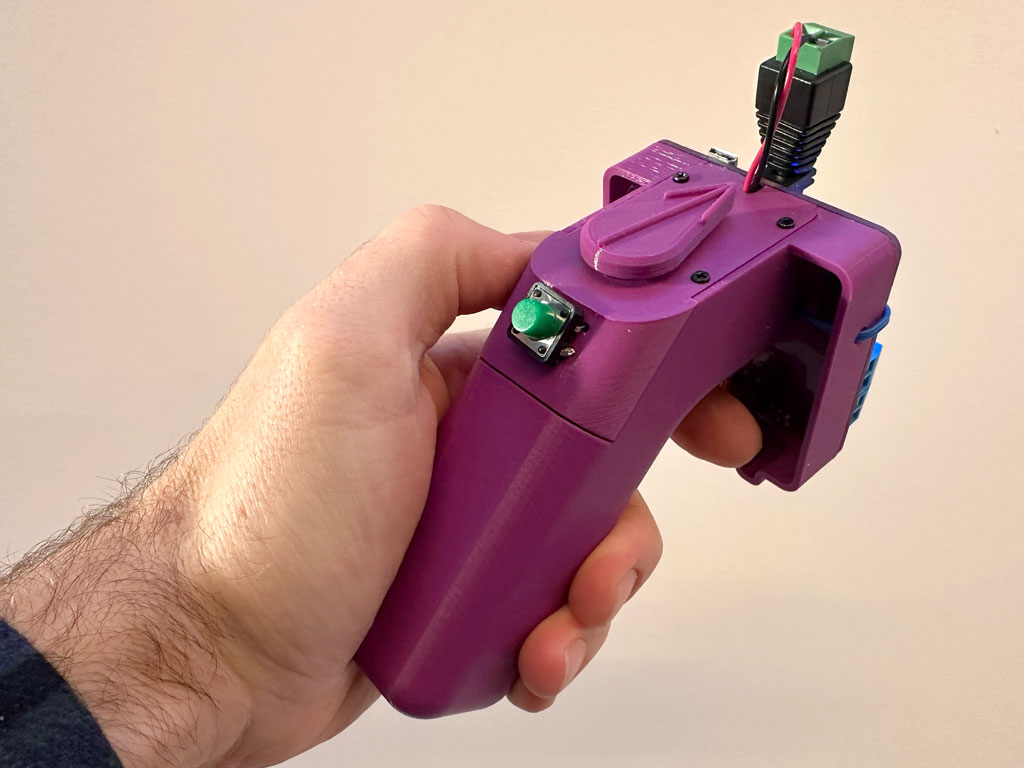
I also thought teams might want to offer the user some control over whatever their AI was doing (or some other aspect of the digital experience) so the buttons would be handy. At this point I didn’t know about MakeSense who are developing an assistive device with roughly the same form factor and appear to be controlling it with a combination of machine vision and GPS.
Several of the teams used the enclosures (I ended up making an extra one from cardboard) and the pointing device (which Chris named the ‘Thumb Gun’) but I’m not sure any of the demos using the Raspberry Pi worked that well, seemingly because the field of view of the camera modules was very narrow, making the ergonomics of anything that was trying to see the area in front of a person, or part of their body, really difficult.
Tactile Direction Indication + AI in Use
During the hackathon was I mainly focused on helping participants to get their hardware working by doing soldering and building things from cardboard but I managed to to get the Thumb Gun hooked up to the AI we built into the Smartibot app. This video shows the pointer tracking one of the little cardboard soldiers I made for Cardboard Telepresence Wolfenstein 3D.
This AI (TinyYOLO on the iOS version) was state of the art in 2018 so I assumed things must have moved forward a lot since then, but the models teams were running on the Raspberry Pis did not seem much more capable. The programming on the Smartibot was very simple (and similar to some of the demos I included in the Kickstarter video) with pointer set to point in the direction that the AI thought whatever thing it was looking for was in, relative to the centre of the phone screen. It relied on the user keeping the Thumb Gun pointing in the same direction as the phone. I tested the setup with Chris on two challenges. The first one I set the AI to only recognise people and I took a winding path through a big space to see if Chris could follow me. As you can see from the video below it worked pretty well.
The in the second test I set the AI to look for a chair. Put a chair somewhere in the space and sent Chris, armed with the phone and Thumb Gun to find it. There’s no video but this he was able to do successfully.
Next Steps
This is the main reason I’m writing this post. There are three use cases where I think this kind of setup could be really helpful. None of these can be satisfied with the AI model we’ve currently got in the Smartibot app but I think they probably are solvable either with more modern off-the-shelf models or with one that has some custom training or tuning.
1) Find the entrance
I have seen for myself and heard many stories of blind people who are able to get to within 5 to 10 metres of their intended destination (either because they have used GPS navigation, or because they have been dropped off by a taxi) but been unable to find the actual entrance.
I think a combination of an image model that is able to run at 4 Hz or faster, to handle working the pointer as the user moves towards the intended target, combined with an LLM which is able to figure out which, of potentially multiple possible doors within the camera’s field of view, is the entrance the user is looking for (likely with some conversational input) could potentially really help solve this problem for some blind and partially sighted people.
2) Find the crossing point
Of the many issues with the usability of tactile paving, tails or stems at crossing points may be the most difficult. Tails are supposed to run from the building line, across the footway, to a controlled crossing point, in order to help blind and partially sighted people to find these crossing points. Their presence is also supposed to be a tactile indication that a crossing point is controlled (a zebra or signal controlled crossing) rather than uncontrolled (a crossing were pedestrians do not have formal priority over vehicles). Very often in practice the tails do not reach to or near to the building line and, as tails are made of the same blister paving as marks the boundary between footway and road, there is lots of scope for confusion about which bit of blister paving is tail and which is crossing point. As a result I have met many blind and partially sighted people (Chris included) who do not use tails at all, and even those that do are often unable to use them to find the crossing point due to insufficient tail length or confusing tactile paving layout.
I think a similar setup, as described in the use case above, with a vision model running in parallel with an LLM, working a pointer could lead a user to a crossing point and also identify to them whether it is a signal controlled, zebra or uncontrolled crossing.
3) Lead me down the clear path
When you watch a Guide Dog partnership working their way down a street and compare it to a long cane user making a similar journey, one of the most striking things is how easily and gracefully the Guide Dog is able to lead their user around obstacles. In comparison, for a long cane user with little or no usable sight, the only way they know of an obstacle is when they hit it with their cane, when they immediately have to break their stride and figure out the best way around it. Many long cane users also struggle to walk in space in a straight line so even on streets where the centre of the footway is not obstructed many long cane users will need to follow either the building line or kerb line, both of which are often strewn with obstructions.
I think this use case could probably be satisfied using only a vision model. It would need to identify obstructions (though not necessarily what type they are, so the vanilla TinyYOLO could probably do this) but also spot the building and kerb lines and help the user maintain a heading between these. This could be combined with either of the use cases above with the AI warning the user they were approaching a crossing point or entrance and the user able to switch from clear path to either of the other modes by pressing one of the buttons.
If you want to build any of these things for yourself and then work on one of these (or another) use case you can download the files for the Thumb Gun and/or the Raspberry Pi wearable enclosure and the Espruino code for to put on the Smartibot board in the Thumb Gun is below. Please let me know if you do!
function onInit() {
  var smarti = require("Smartibot");
}

function aiResetC(){
  var smarti = require("Smartibot");
  smarti.setServo(8, 50);
}

function aiDetectC(t,x,y){
  decAngle = 50 - (x*4);
  var smarti = require("Smartibot");
  smarti.setServo(8, decAngle);
}


